| This article is a stub. You can help the Atomicrops Wiki by expanding it. |
There are approximately two dozen different enemy types, in addition to many bosses and mini-bosses, in Atomicrops.
All biome-exclusive enemies (from the Plains, Desert, Jungle or Tundra) have a stronger version of themselves in the second area of that biome. Aside from their looks, the only differences between them is a considerable increase in their health, and sometimes the number of bullets they shoot.
Most Enemies have a chance to drop Fertilizer once defeated, with those in the four Biomes sometimes dropping seeds. Heart Beet seeds are rare drops from regular enemies.
Regular Enemies[ | ]
Common Enemies[ | ]
These are enemies found in multiple Biomes, not necessarily including the Farm.
(Names are unofficial) Base HP is calculated via Tiny Thundercloud. The values given are from Year 1 with an error ≈ 4.
Yearly Health Scaling is the % increase of the enemy's health from their Base Health every year. (Ex: If an enemy's Yearly Health Scaling is 10% and their Base Health is 50, then their health would be 55 on Year 2, 60 on Year 3, and so on.) It is also an approximation
| Image | Enemy | Base HP | Yearly Health Scaling | Location | Attack |
|---|---|---|---|---|---|
| Bundit Guard | 50 | ~8.9% | Desert area 1 Plains area 1 |
Slow single shot, ranged. Has to stop moving briefly and take aim before firing. Can fire more shots in a burst in later Years. | |
| 160 | ~4.4% | Jungle area 1 Tundra area 1 | |||
| 260 | ~4.4% | Desert area 2 Plains area 2 | |||
| 320 | ~4.4% | Jungle area 2 Tundra area 2 | |||
| Ornithumper | 50 | 0% | All Biomes, area 1 Desert area 2 Plains area 2 |
Flies at player, dealing contact damage. Only found in Camps. | |
| 350 | 0% | All Biomes, area 2 | |||
| Sniper Bundit | 200 | ~8.9% | All Biomes, area 2 | Aims at player with a red line, then shoots a fast-moving bullet. Will run away if approached, if not lining up a shot. | |
| Roach | 50 | 0% | All Biomes, area 1 | Wanders randomly, occasionally firing a single shot directly at the player. Destroyed with Roach Killer, although bullets can still be fired at the player from roaches outside its area of effect. | |
| 160 | 0% | All Biomes, area 2 | |||
| Beeson | 80 | 0% | All Biomes, area 1 | Appears randomly in groups, which move through the biome and ignore the player. Deals contact damage unless the player has the Beeson Whisperer upgrade. Always drops fertilizer, and also has a high chance of dropping seeds. | |
| 120 | 0% | All Biomes | |||
| 200 | 0% | All Biomes, area 2 | |||
| Golden Goose | Any Biome (rare) | Does not deal damage. It will run away from the player, dropping seeds and Fertiliser when hit, and once its health is depleted enough will start to burrow to escape. If killed, it drops a large amount of Fertilizer and a rare seed. | |||
| Tree Monster | 350 | ~17.8% | One in Desert 1 One in Plains 1 |
Protects the Golden Pupa Bulb. Attacks by jumping onto the player, but deals no contact damage when not landing from a jump. | |
| 500 | ~26.7% | One in Jungle 1 One in Tundra 1 | |||
 |
1800 | ~17.8% | One in Desert 2 One in Plains 2 |
Protects the Golden Pupa Bulb. Attacks by jumping onto the player, but deals no contact damage when not landing from a jump. Each of the four Monsters has a different additional attack, and companion enemies spawn with them. | |
 |
2600 | ~17.8% | One in Jungle 2 One in Tundra 2 |
Farm Enemies[ | ]
These are enemies that appear on the Farm.
| Image | Enemy | Base HP | Yearly Health Scaling | Time of Day | Attack |
|---|---|---|---|---|---|
| Blue Mole | 70 | ~8.9% | Day
If the player has Irrigating Moles, then all times. |
Travels underground. Pops up to attack by shooting a few bullets at the player. | |
| Star-Nosed Mole | 250 | ~6.4% | |||
| Weed Monster | All times | Spawns from fully-grown weeds on the farm, and shoots multiple bullets at the player's approach. Letting weeds get thick increases the chance of them spawning. Does not appear in Years 1 and 2. | |||
| Blunderbunny | 50 | ~3.1% | Night | Shoots single bullets at the player, with a short pause before each shot. Gets exhausted after a short time, and will then run away until the next wave starts. | |
| 160 | ~3.3% | ||||
| Slug | 120 | ~8.9% | Night | Tries to eat crops. Deals no contact damage, but starting on Year 2, it will chase the player and shoot bullets if no crops are planted, or if all crops have been eaten. | |
| Banana Slug | 330 | ~11.6% | |||
| Fruit Fly | 60 | 0% | Night | Appears in swarms. They will hover in one place before attempting to eat crops. Deals no damage to the player. | |
| 220 | 0% | ||||
| Demobun | 80 | ~8.9% | Night | Throws bombs at the player with no range limit. Areas about to be hit by bombs will be highlighted, giving the player time to move. | |
| Gatling Gun Bundit | 250 | Night | Stops moving, charges for a bit, then fires a rapid stream of bullets at the player. | ||
| 800 | ~17.7% | ||||
| Sniper Bundit | 200 | ~8.9% | Night | Aims at player with a red line, then shoots a fast-moving bullet. Will try to run away if approached when not lining up a shot. | |
| Cherry Bomb | 600 | 0% | Night | Runs at the player and explodes. It will pause for a moment when it reaches the player's location, giving them time to move away before it blows up. It is, however, possible to kill before it explodes. |
Special Enemies[ | ]
The following enemies only spawn on the Farm during boss fights or special events.
| Image | Enemy | Base HP | Yearly Health Scaling | Event | Attack |
|---|---|---|---|---|---|
| Witch | ~1572 | Alien Moon Slug Moon |
Flies around the Farm and will sometimes stop near the player's crops to cast a spell in a set range. This spell will affect all crops within its range by either lighting them on fire or reducing them back to their freshly sown state. Both spells will deal damage to the player if they are caught within the range. Sometimes drops a Scroll on death. | ||
| Crow | 150 | Alien Moon Slug Moon |
Appears at the start of each new wave. Flies in a straight line across the screen in groups and never breaks ranks, even if the player damages it. Drops a larger amount of Fertilizer on death. | ||
| Loot Lantern | 8 | 0% | All Blood Moon events | Drifts aimlessly, dealing no contact damage. On death it drops a large amount of Fertilizer, a seed, and sometimes a Pickaxe. | |
| Mini U.F.O. | 190 | ~4.7% | Alien Moon U.F.B. boss fight |
Attempts to abduct a single Farm Animal. If successful, it will slowly flee off of the player's Farm. Sometimes also shoots a quick burst of bullets at the player. | |
| Alien Pod | 600 | 0% | Can be found after an Alien Moon or U.F.B. boss fight | Deals no damage and does not move. Releases an abducted Farm Animal or Alien Pet when killed. Also has a chance of spawning after certain Home Improvements have been purchased. | |
| Fire Slug | ~300 | Slug Moon | Tries to eat crops and sets all nearby crops on fire. | ||
| Moon Crater | 200 | Bundertaker boss fight | Deals no damage, but periodically spawns albino rabbits unless destroyed. Often spawns in small clusters. | ||
| Albino Rabbit | 80 | Bundertaker boss fight | Spawns from moon craters created by Bundertaker. They chase the player, dealing contact damage, and due to their speed can quickly become overwhelming if not killed. | ||
| Baby Spider | 200 | Itsy Bitsy boss fight | Hatch from eggs during the boss fight. They behave similarly to Desert Scorpions, and can make dodging Itsy Bitsy's bullet attacks more difficult. | ||
 |
Demon Vegetable | 800 | 0% | Atomic Winter | Spawned by Corpse-a-Copia: remains in one place, but shoots bullets at the player in a line. Also periodically explodes, dealing damage in a large radius around itself. Drops a large amount of Fertilizer and seeds when killed. |
| Demon Veg Walker | 500 | ~8.9% | Atomic Winter | Walks around slowly, firing bullets at the player and dealing contact damage. Due to its relatively small size, it can be easy to miss, particularly during more chaotic fights. | |
| Vegetaskull | N/A | N/A | Atomic Winter | Drifts across the farm, either horizontally or vertically, during the Corpse-a-Copia fight. The longer the fight lasts, the more will spawn. Immune to Weapons, but can be destroyed with the Sow Shield or Harvest Shield upgrades. |
Desert Enemies[ | ]
These enemies are exclusive to the Desert areas.
| Image | Enemy | Base HP | Yearly Health Scaling | Location | Attack |
|---|---|---|---|---|---|
| Scorpion | 50 | ~8.9% | Desert 1 (Roaming) | Moves randomly in short, quick motions, and periodically fires a small burst of shots. On year 1, it fires only three shots, but its bullets will increase in number with higher years. Its shots generally don't target the player directly, but can be annoying to avoid when other enemies are attacking as well. | |
| 260 | ~8.9% | Desert 2 (Roaming) | |||
| Can Crab | 120 | ~8.9% | Desert 1 Camps | Wanders randomly at first. It will periodically stop moving and take aim at the player. Repeatedly shoots 4 bullets in a perpendicular line, but does not track the player while shooting. Deals no contact damage, and cannot fire without pausing its movement for a short time first, and so is relatively safe to approach while it's moving. | |
| 400 | ~8.9% | Desert 2 Camps | |||
| Shadow Vulture | 50 | ~8.9% | Desert 1 (Roaming) | Flies in large, sweeping, circular motions, and will charge the player once it catches sight of them. | |
| 240 | ~8.9% | Desert 2 (Roaming) | |||
| Cactus | 120 | ~8.9% | Desert 1 Camps | Immobile, and fires a burst of 8 shots in diagonal and cardinal directions periodically, without any regard for the player's position. | |
| 400 | ~8.9% | Desert 2 Camps | |||
| Shield Bundit | 240 | 0% | Desert 2 Camps | Fires a cone of flame, with the area of effect indicated a few seconds before it fires. Cannot be damaged from the front, but will constantly turn to face the player. |
Plains Enemies[ | ]
These enemies are exclusive to the Plains areas.
| Image | Enemy | Base HP | Yearly Health Scaling | Location | Attack |
|---|---|---|---|---|---|
| Bull Boy | 120 | ~8.9% | Plains 1 (Roaming) | If shot, it will charge at the player, dealing contact damage. Sometimes goes into a rage without outside interference. | |
 |
Mammoth | 320 | ~8.9% | Plains 2 (Roaming) | |
| Bat | 35 | Plains 1 Camps | Always spawns in a large group, tightly packed together. When attacked, flies quickly in a large circle, and will periodically charge at the player. All bats in the circle will convene on the player's position when the charge is initiated, then they will resume flying in a circle around that new position. | ||
| Pterodactyl | 120 | Plains 2 Camps | |||
| Pine Bomber | 120 | ~8.9% | Plains 1 Camps | Targets the player at a very high range with explosive pinecones that highlight the targeted area when launched. Does no contact damage and does not move. | |
 |
400 | Plains 2 Camps | |||
| Wasp | 50 | ~8.9% | Plains 1 (Roaming) | Flies at player, dealing contact damage. Moves erratically and will occasionally ready a charge. Be careful on the higher years, because this enemy is very fast and leaves very little room for error when charging from offscreen. | |
| 240 | ~8.9% | Plains 2 (Roaming) | |||
| Sidewinder | 60 (per segment) | 0% | Plains 2 Camps | Chases the player as a head followed by body segments. Attacking it gradually destroys the body until only the head is left, which can then be killed. |
Tundra Enemies[ | ]
These enemies are exclusive to the Tundra areas.
| Image | Enemy | Base HP | Yearly Health Scaling | Location | Attack |
|---|---|---|---|---|---|
| Ice Mage | 200 | ~8.9% | Tundra 1 Camps | Summons a circle of snowballs that will spin around the player's location, and occasionally shoots a few bullets at the player. | |
| 500 | ~3.5% | Tundra 2 Camps | |||
| Fox | 100 | ~8.9% | Tundra 1 (Roaming) | Wanders randomly and leaves frequent trails of nearly immobile bullets behind itself. Can cut off your ability to dodge other attacks if not taken care of. | |
| 260 | ~8.9% | Tundra 2 (Roaming) | |||
| Listing Owl | 120 | ~8.9% | Tundra 1 (Roaming) | Flies around somewhat randomly, and occasionally shoots out bullets that leave a twinkling sparkle in their wake and move in small circles instead of a straight line. | |
| 240 | ~8.9% | Tundra 2 (Roaming) | |||
| Volcano | 200 | ~8.9% | Tundra 1 Camps | Shoots rocks in highlighted areas around itself with no regard for the player's position. | |
 |
500 | ~8.9% | Tundra 2 Camps |
Jungle Enemies[ | ]
These enemies are exclusive to the Jungle areas.
| Image | Enemy | Base HP | Yearly Health Scaling | Location | Attack |
|---|---|---|---|---|---|
| Panther | 80 | ~8.9% | Jungle 1 Camps | Vanishes upon being activated, creating a large highlighted oblong area that it will strike after a brief delay. It will strike between one and three times, depending on the Year that the player is on, and will be invulnerable until it finishes its attacks. The Tier 2 Panther will strike in a cross pattern instead of an oblong. | |
| 200 | ~8.9% | Jungle 2 Camps | |||
| Venus Flytrap | 100 | ~8.9% | Jungle 1 Camps | Immobile and does no damage on its own, but frequently spawns flies that move erratically and deal contact damage. | |
| 220 | ~8.9% | Jungle 2 Camps | |||
| Lizard | 60 | ~8.9% | Jungle 1 (Roaming) | Occasionally charges in a random direction, shooting bullets while doing so. | |
| 120 | ~8.9% | Jungle 2 (Roaming) | |||
| Jungle Beetle | 30 | 0% | Jungle 1 (Roaming) | Moves randomly in groups. They deal contact damage, and if any of the beetles in the group are attacked, all beetles in the group will fly away in somewhat random directions. | |
| 80 | 0% | Jungle 2 (Roaming) | |||
| Bramblemancer | 80 | Jungle 1 Altar Camps | Summons thorns which chase the player and deal damage on contact. | ||
| 240 | ~2.2% | Jungle 2 Camps |
Elite Enemies[ | ]
Starting in Year 4, Special versions of regular Enemies may appear in some Camps. These enemies are tougher, with unique abilities, but drop more loot.
Later years have higher instances of elite enemies.
Bosses[ | ]
For every season except Nuclear Winter, one of the two available bosses will appear on the third and final night.
On defeat, they will drop Fertilizer, a Rose seed and a Heart Beet or an oregano seed if oregacrow is being played. If the relevant Home Improvements have been purchased, they will also drop Cornucopias and sometimes Scrolls.
Spring[ | ]
Monstropod[ | ]

The Monstropod is a giant snail, ridden by a bundit. The bundit constantly shoots bullets at the player, while Monstropod himself will periodically approach to try to eat your crops. After he takes enough damage on a given attempt to eat your crops, he will flee, leaving multiple Slugs behind that will try to eat your crops. Monstropod himself does not deal contact damage, but the bunny riding him will probably shoot you if you try to take advantage of that.
Unfriendly Worm[ | ]
The Unfriendly Worm flies through the air, dealing contact damage. It generally doesn't target the player, but its erratic and rapid movement can make it difficult to avoid damage. It does not attack your crops in any way. As the Worm is damaged, its body will shrink and it will charge at the player with increased speed.
The safest strategy with the Worm is to always avoid being near its head, so that its sudden changes in direction won't leave you too close to dodge it. Constantly running to attack it from behind is the best way to do this.
Summer[ | ]
Sol Crusher[ | ]

Sol Crusher is a huge sun with a rainbow around her. She will channel sunlight into crops, which will set them on fire. Flaming crops can be put out by watering them; cows can be of great assistance in keeping your crops safe while fighting her. She will occasionally enrage, spewing out bullets in all directions.
When her health depletes, she will enter a second form, looking much meaner, while the rainbow disappears. Her attacks generally remain the same, except that when she enrages, she will also throw bombs in all directions. Be warned that she does contact damage, and her hitbox gets much bigger as soon as she enters her second phase; be careful not to get hit by surprise by being too close upon her changing forms!
U.F.B.[ | ]

The U.F.B. occasionally shoots a fire beam at the player that tracks their position, forcing them to move constantly. The beam can also set crops on fire, and may focus on those instead. Only the flaming circle at the beam's end damages the player. It will also occasionally fly into the sky, and highlight an area around the player which will explode. It can also stop moving, and shoot rings of bullets out of itself. These rings have gaps in them, however two rings next to each other won't have gaps in the same places, forcing the player to strafe in between them.
The special Mini U.F.O. enemies can also be found during the boss battle, otherwise exclusively spawning at the Alien Moon events. Make sure to target the smaller U.F.O enemies quickly, as they will attempt to abduct your valuable Farm Animals.
Fall[ | ]
Old Mech-Donald[ | ]
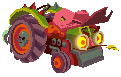
Old Mech-Donald is a tractor with a face resembling a farmer. He has 3 attacks: firstly, he will stay in one place, spewing out a lot of smoke clouds in the general direction of the player. Secondly, he will charge in a square pattern around the crops, stopping at every corner for a second to shoot some more smoke clouds. Finally, he will sometimes disappear, summoning large tractor tires which will either travel from down to up, while moving from left to right, or from left to right while moving from down to up. His attacks have large hitboxes and can be difficult to avoid: stay on your toes!
The Spore You Know[ | ]

The Spore You Know is a giant Mushroom that shoots spore-shaped bullets everywhere. On death, it unloads a number of (non-bullet) spores. These spores will quickly hatch into smaller mushrooms which, on death, will spawn even smaller mushrooms, and theirs will spawn even smaller ones. Each mushroom will periodically release spores that will duplicate that size of mushroom if not destroyed, so the boss can effectively heal itself if the player does not aggressively hunt down the various spores and shrooms. The number of spore bullets can quickly become overwhelming if the mushrooms are ignored.
After the final mushroom is killed, the boss is defeated.
Winter[ | ]
Bundertaker[ | ]

The Bundertaker is a huge buff rabbit with a gun standing on a prop moon, which hangs from the sky on ropes. He shoots large bullets, which take a while to charge, and can also spawn moon craters around him. These craters spawn albino rabbits to chase the player and deal contact damage.
Occasionally, Bundertaker will go up into the sky, and start sleeping. During this time he cannot be damaged, and any rabbit minions will also sleep until he wakes up. This phase is intended so that the player can defeat any leftover minions, to not be overwhelmed.
Itsy Bitsy[ | ]
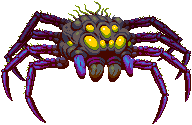
This giant spider will run around frantically with such incredible speed that she is nearly impossible to hit. She can leave strings of bullets as she's running, making it difficult to avoid her. She will also occasionally stop to fire arrow-shaped rings of bullets with gaps in them, quite similarly to the U.F.B.'s attack. This is a good opportunity to hit her, since she rarely stays still long enough to get shots in.
After certain damage thresholds, she will spawn smaller spiders that will behave similarly to the Desert Scorpions and must be killed. Turrets, and Drones, and especially Hogs are a huge help in this fight, as they will rarely miss with their attacks, allowing the player to let them do most of the damage while they focus on protecting themselves from her. Scarecrows are also useful for blocking her numerous bullet attacks.
Nuclear Winter[ | ]
Corpse-a-Copia[ | ]

Corpse-a-Copia is the final boss of the year, and the Nuclear Winter season consists exclusively of its boss fight, beginning as soon as you take the helicopter. The boss is a combination of fruits and vegetables forming a face and hands.
Unlike other enemies of the game, it can only be damaged by harvesting crops, so the fight consists mainly in dodging attacks and planting seeds.
It cycles through its attacks, which include:
- Repeatedly swiping at the player with its hands, forcing the player to move out of the highlighted area quickly
- Raising its hand over the player's crops and snapping, which lights all crops on fire
- Summoning nightmarish giant crops which slowly move across the map and deal contact damage, but which can be destroyed
- Moving across the map itself, dealing contact damage
It also summons various two types of crop enemies: one will shoot an array of bullets at the player, and one that will explode in a gargantuan area after a set time. Crop skulls will also spawn, slowly moving across the map and dealing contact damage. These cannot be destroyed, and more will appear the longer the fight lasts, making it tricky to move around.
Trivia[ | ]
- During the opening tutorial, a few of the enemies can be see as their normal animal counterparts. These animals are the bunnies and slugs, which both end up as the blunderbunny enemy and slug enemy. The bunnies can be seen next to the flower, and the slugs can be seen off-screen eating a bush.
- Monstropod is a portmanteau made from the words 'Monster' or 'Monstro' and 'Gastropod'.
- Sol Crusher is a pun made from the words 'Sol', meaning ‘sun’ in Latin, and 'Soul Crusher'.
- Old Mech-Donald is a pun made from the words 'Mech' and 'Old McDonald' from the nursery rhyme.
- Bundertaker is a pun made from the words 'Bun' or 'Bunny' and 'Undertaker'.
- One of Bundertaker's opening lines, "Its either the carrot or the stick, and I'm all out of carrots", is a reference to the 1988 movie "They Live"
- Corpse-a-Copia is a pun made from the words 'Corpse' and 'Cornucopia'.
- Unfriendly Worm's name is probably a reference to the item called Helpful Worms.
- U.F.B. is probably an abbreviation of Unidentified Flying Bunny, which is a reference to the abbreviation 'U.F.O', which stands for Unidentified Flying Object.
- The Spore You Know is a pun made from the words 'Spore' and 'The More You Know' which is probably a reference to an internet meme.
- Itsy Bitsy's name is probably taken from the nursery rhyme
- The sprites for Corpse-A-Copia refer to them as "VegBalrog". This is likely a reference to a Balrog from "The Lord of the Rings" by J. R. R. Tolkien.
- Beeson, Bundits, Moles, Lizards, and Wasps are the only confirmed enemy names.
| |||||